Knowledge Base Article Custom Google App
Overview:
In order to provide users with maximum flexibillity, we have introduced user-specified OAuth2 Applications for the following Google REST services:
- Google Admin
- Google Analytics
- Google BigQuery
- Google Calendar
- Google Cloud Monitoring
- Google Cloud Storage
- Google Dataplex
- Google Drive
- Google Forms
- Google Maps
- Google People
- Google Search Console
- Google Sheets
- Google Tasks
In case you want to use the COZYROC application, leave the values as is and continue onwards with the generation.
If you have an application all you have to do is edit the default values while generating your OAuth2 token and SSIS+ will generate and refresh the token with your application.
If you wish to create your very own application, follow the simple steps below. You can access the official Google authentication here.
Step 1: Access Google Cloud Console
Log into the Google Cloud Console, you can access it here and click on the project button.
Step 2: Create a New Project
Click on the New project button. Enter a name for your project. If your account belongs to an organization, you may choose it as a Parent resource.
 Projects under an organization inherit IAM Access permissions. If you proceed without an organization, no default values are set, but they can be changed later.
Step 3: Enable APIs & Services
- Click the top-left button to show the side panel.
- Select APIs & Services, then select Enabled APIs & services.
- Review available APIs; if a specific one (e.g., Google Cloud Monitoring) is missing, click Enable APIs and services to add it.
Step 4: Configure the OAuth Consent Screen
- Navigate to the OAuth consent screen submenu.
- Click Audience from the left menu to configure your needs.
- User Type: Select Internal (available only to organization accounts) or External (available to any Google account).
- Publishing Status:
- Testing: Limits users to 100 and tokens expire in 7 days.
- Production: Removes these limits but requires verification.
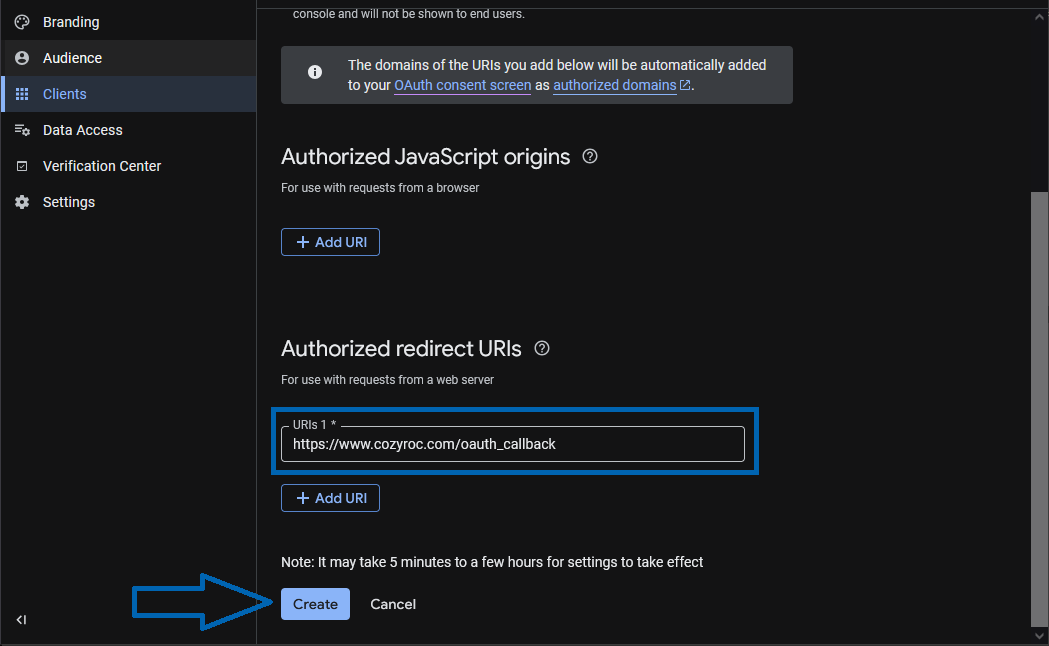
Step 5: Create OAuth 2.0 Client IDs
- Change menus to Clients and click the Create client button.
- Select Web Application as the type and provide an appropriate name.
- Authorized Redirect URI: You must add the following COZYROC Callback URI:
https://www.cozyroc.com/oauth_callback. Hit Create.
Finalizing the Integration
Once created, copy the client_id and client_secret. Optionally, you can download them as a JSON file.
Paste these credentials into the COZYROC REST Connection Manager to complete the setup. Keep these credentials safe!.
Book a Success Call
Need Help?
Evaluating COZYROC? --> Success Call
Customers --> Submit a Ticket
Related Articles
What is an experimental REST configuration and where can I find the documentation for the experimental REST configurations?
Experimental REST configurations are a starting point for configurations to REST services that COZYROC has provided in order to give you a jump start to using the Custom REST Configuration Editor which will allow you to continue building out any of ...How to implement paging in the Custom REST Configuration Editor.
There is a demonstration video that explains three different pagination templates available in the Custom REST Configuration Editor. This demonstration video only shows a brief overview that the templates are available and how they can be used to ...How to set up Fiddler for testing a REST configuration
This article (<-- Click the link) describes how to install Fiddler to trace traffic as well as decrypt https traffic and how to set up filters if you know what to filter on. Since the REST authentication will use https, it can be helpful to close any ...How to manually generate a Google Services Token?
A token-based authentication system allows users to enter their username and password in order to obtain a token, which allows them to fetch a specific resource, without using their username and password. Once their token has been obtained, the user ...How to use Microsoft Graph REST Configuration for SharePoint automation
If you are working with SharePoint Online, we recommend switching to Microsoft Graph Connection, which fully supports Modern Authentication. Additionally, we recommend using the latest version 2.2 or higher of COZYROC SSIS+. For upgrading details, ...